Imaging Techniques
Webcam imaging with Philips ToUcam 740 Pro
Chapter 3 - Stacking frames
| Chapter 4 |
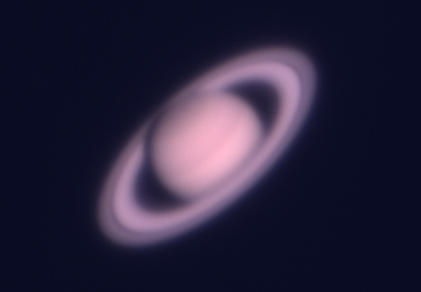
After the AVIs have been captured, the various processing steps begin. Here's one typical raw frame out of an AVI of Saturn with about 1800 frames total:

Download excerpt of the AVI (~12sec, 2366KB, DivX Codec)
The single frames of the AVI differ in image quality (sharpness, deformations...) caused by seeing conditions, mount/scope vibrations etc. and alignment differences of the image caused by mount tracking, seeing conditions, scope movements by wind etc. so that the first steps in processing the AVI data usually are:
- Determining image quality of each single frame
- Registering images of all frames to a common base
Software
The amount of raw frames makes the automation of these steps by a software necessary. Two excellent programs are:
The following processing tutorial applies to Registax 2.1.1 - meanwhile Registax v3 is available, all examples can be applied to Registax v3 also.
Starting with Registax
Start Registax, press "Select input", browse to the *.avi file and open it.

Step 1 - Select reference frame
On the bottom of the first screen is a slider to browse through the frames of the AVI. Go through the frames and find a frame that will serve as a reference frame for the processing, it should fullfill the following criterias:
- Sharpness - select one of the sharpest frames you find
- No/lowest distortion - select a frame with the lowest distortion of the object since the differences of all other frames to the reference frame will be calculated to find the best suited frames for stacking
Step 2 - Select box size and alignment feature
The alignment box is a square subset of the image that will be used for the calculations of quality and frame alignment. On the left of the screen are 4 different sizes for the alignment box selectable. Choose an alignment feature that is typical for the object and that represents frame quality. This can be only a fragment of the object (left/right part of Saturn's rings, shadow of Jupiter's moon, crater on lunar image...) or the whole object itself like in this case. When the size of the box is chosen, move it over the reference frame to choose the location of the box. Place it with a mouse click to continue to the next Registax screen:

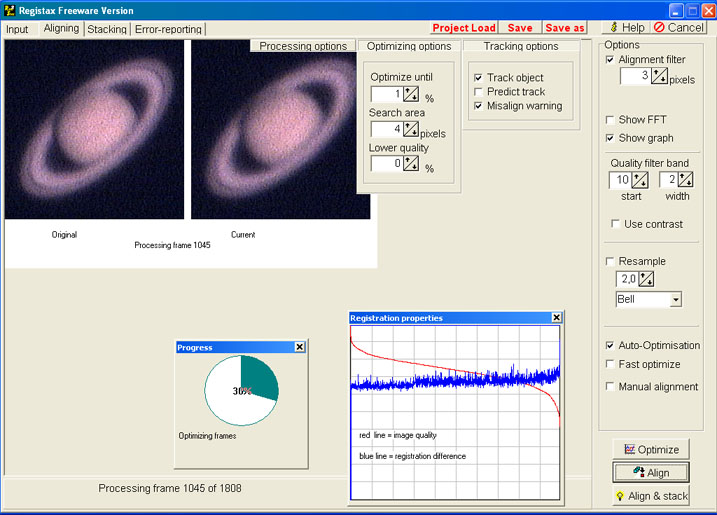
To understand the next screen it's important to have a little knowledge about Fourier Transformations (FFT = FastFourierTransformation) and spatial frequencies. The import part of this screen is the "Registration Properties" box switched on/off by the "Show graph" button. It shows a histogram of the spatial frequencies contained in the alignment box of the reference frame calculated by a 2D Fourier Transformation. The (filtered) FFT spectrum is also available in a separate box switched on/off by the "Show FFT" button.
Step 3 - set FFT alignment filter
In order to align frames Registax combines each frame with the reference frame and calculates a FFT to judge displacement. Applying a FFT filter helps in finding displacements more precisely, the filter size is displayed as the blue bar in the "Registration Properties" box. A quite good rule of thumb to set the filter size to the value at which the red spatial frequency histogram curve changes it's slope from > -1 to < -1 and to aim for a small but round red area in the FFT-spectrum.
Step 4- set quality filter
To judge image quality (sharpness) of a frame Registax sums the amounts
of spatial frequencies of a defined band of the histogram curve. Position
and size of this filter band is variable and the task is to find the right
values.
Higher spatial frequencies (to the right in the histogram) represent dark-light
changes in a small area, lower spatial frequencies (to the left in the
histogram) represent dark-light changes over a wider area. The quality
filter band should be set to a frequency range that represents an image
feature with high local contrast. Higher values in the histogram (y-value)
within the quality filter band indicate a sharp frame, lower values indicate
an unsharp/blurred frame.
The example shows the quality filter set to detect a sharp cassini-division
of Saturn. Avoid a quality filter band in the range of image-noise, pixel
to pixel differences caused by noise should be the highest spatial frequencies
in the image.
When everything is set press the "align" button. When you are sure your settings a correct, check the "auto-optimisation" button before.
Step 5 - quality estimation and registration
Depending on machine speed, frame count and alignment box size this step
can take a while, usually a time to fetch some coffee ![]() .
Registax will loop through all frames of the AVI, estimate frame quality
and register the frames to the reference frame. When this first loop is
done the "registration properties" graph will show two curves
showing frame quality and registration difference to the reference-frame,
frames are sorted by image quality, best frames first.
.
Registax will loop through all frames of the AVI, estimate frame quality
and register the frames to the reference frame. When this first loop is
done the "registration properties" graph will show two curves
showing frame quality and registration difference to the reference-frame,
frames are sorted by image quality, best frames first.
If settings for quality estimation has been correct the quality graph
sould show a nice falling slope of decreasing image quality (unless seeing
during image capture has been sensational...). The increasing registration
differences in the graph is a good indication for correct alignment parameters.
Step 6 - alignment optimisation
The optimisation loops will optimise the alignment of the frames against
the reference frames. Optimisation will start automatically if the "auto-optimisation"
button is checked, otherwise press the "optimise" button.
Registax will loop through all frames and optimise frame registration.
With the "lower quality" setting optimisation can be limited
to the best frames only. The "optimize until" setting controls
when optimisation will end, it will stop when no frame in the last loop
has had a registration-difference greater than the chosen value.
Step 7- stacking frames
When optimisation has ended, switch to the "stacking" tab on top.

The "stackgraph" allows to limit the frames to be stacked to those with best quality and least registration-differences. Use the two sliders to cut-off lower quality frames and frames with higher registration difference. Moving the sliders will display the corresponding frames. The number of frames selected for stacking with the current settings will be displayed on the bottom of the window. The more frames will be stacked the better the signal to noise ratio in the final image. Usually a mix of quality limit and registration-difference limit is advisable.
Now press "stack" to perform the frame-stacking. When stacking is done the resulting image will be displayed.
662 of 1842 frames stacked
| Chapter 4 |